Photobucket Photobucket Photobucket Photobucket Photobucket
Showing posts with label girl. Show all posts

Sunday, August 18, 2013

Fold Over Elastic Flower Headband Tutorial

If you haven't noticed by now, I am a little beyond obsessed with making headbands for my Quinn. They are such a fun way to change up her outfits, and if you know a few key Etsy shops, they can also be a VERY affordable, and dare I say cheap, way to add to your little lady's wardrobe!
When I found out I was having a baby girl last year, I immediately went into to headband mode, and with the help of my Sister in Law, learned about lots of Etsy shops to help me keep my cost under control! Elastic by the Yard quickly came to be one of my very favorite shops! I love the quality and colors of the elastic they have, and their packaging is so cute an convenient! They are wrapped neatly around spools, instead of just floating around in my box! It does wonders for my OCD! ;)

You need:
Colored FOE (Fold Over Elastic) about 20 in.
White FOE
2 -- 2" felt circles
A medium button
Scissors and a glue gun
1. cut 12 1" strips of elastic, and hot glue the ends together, making the petals.
2. glue 6 petals around the felt circle.
3. on the OTHER side of the felt, glue the remaining petals in the open spaces.
4. attach your headband.
5. Glue the other felt circle over the elastic.
6. Glue your button to the top.
SUPER CUTE! Right!? That's what I thought and REALLY easy! 
Happy headband making!!
All elastic was provided by the Etsy Shop Elastic By The Yard. However, all opinions and ideas are 100% my own.

Thursday, July 25, 2013

DIY Minky Tag Blanket


Quinn is finally getting to the 'toy' age! It's so fun to watch her discover new things and play with anything and everything she can get into those chubby little fingers!

I've had the supplies to make this taggy blanket for quite awhile now, as in, I bought it all when she was like 5 days old! But it's taken me this long to get around to it! ;) I don't know why either? Maybe because until now, I knew she wouldn't have much interest in it!
Oh and just a warning... this was my very first time sewing with Minky fabric... so don't judge me too harshly! ;)

You'll need...
2- 13x13 squares of Minky fabric* ( I think I got 1/3 yd and had lots leftover)
Around 40 strips of ribbon, 4 inches long. I used 36 strips, but some of mine were the 1 inch ribbon, so those took up more room.
Pins and a sewing machine.

1.After you cut your fabric and all your ribbon, fold each piece of ribbon in half, and pin it to the right side of one of the minky squares, facing IN.
 2. Sew all the way around the minky, attaching the ribbon strips to one of the minky squares.
 3. Pin the other square of minky on top, right sides together, and pin pin pin!! Leaving about 2 inches so you can turn it around. Then, sew all the way around, sewing both squares together, with the ribbon in the middle.
4. Then, flip the blanket rightside out, through the 2 inch hole that you left open.
5. Sew around the edge. (This is the part where you don't judge me)

 
AAAAND... you're done! ;)
This really was an easy project! It's not PERFECT... but, it's for a 3 month old ;) I don't think she'll mind one bit. 

*Side note: I think looking back, I wouldn't of done both sides minky... I would of done one side with flannel, or even cotton. I'm pretty sure it would of been easier to sew.
 

Wednesday, July 17, 2013

Rolled Fabric Flower


Seriously... is she not the cutest little nugget you've ever seen!? I can't get enough! There's a joke amongst our family that this girl never wears the same headband twice. And while that's not entirely true... it isn't far from it!

But I just can't help it! Headbands are SO much fun! And a really in-expensive way to accessorize! ;)
Fabric flowers are one of my very favorites! They are so easy and cheap and fast! You can make one for every outfit for just pennies! You can even use scrap fabric!
You'll need:
Fabric (1 strip = 1.5 inch x 3 feet)
scissors
hot glue
felt (or more fabric)
elastic headband material (or a clip)
 
 1. Tie a knot in the end of your fabric strip.
2. Begin rolling the fabric around the knot. As you roll, add small dots of hot glue to keep the coils in place. The tighter you roll, the smaller the 'coils'.
3. Keep rolling... and rolling... and rolling.
4. Once you have about 2 inches left, glue your coil around the back, and once its dry, cut off the excess.
5. Glue a circle of felt onto the back, to keep the coils in place.
6. There you go! All there is left to do is add a clip, or an elastic headband (you can find those on etsy or, even at walmart and joannes!)
 

What are your favorite headband's to make?

Monday, April 2, 2012

GREAT Bow Giveaway!!

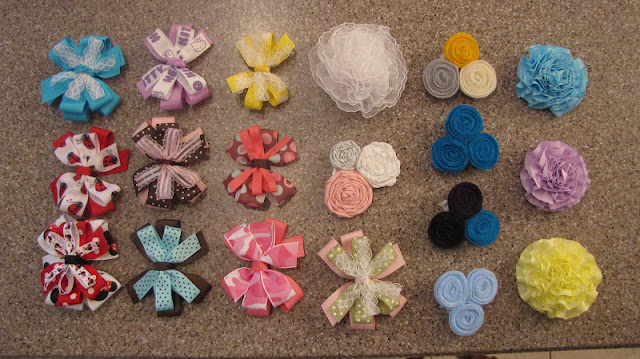
My Sister in Law is doing ANOTHER awesome bow giveaway! Enter here!
Look at all those super cute bows! Just in time for spring! Makes me want a little girl!

Tuesday, November 29, 2011

Another Hairbow Giveaway!

My cute Sister in law is doing another bow giveaway! Isn't she great!?!
 It's an AWESOME one this month! She is giving away a bow and rosette set for each month! That's 24 in all!! And they are great quality and made REALLY well! I would know, I've seen her make them!
 If I had a girl I would totally enter! But, I don't think my husband would appreciate our little Mr. wearing such a darling hair accessory! ;) Head over to her blog to enter!

Sunday, October 2, 2011

BOW Give-Away! {Guest post: Mindy}

My Sister in law Rocks and made a bunch of bows for a THANKSGIVING Bow Give away! So go to her blog by following the link:  

http://jasonheidi.blogspot.com/2011/10/thanksgiving-bow-giveaway.html


Time to enter ends Wednesday, so hurry and Enter!!

THANKS HEIDI! ♥

Saturday, August 27, 2011

Tu-Tu's!!! {Guest Post by Tasha}

So I am starting Christmas early this year (one of my goals!) and I am making Tu-Tu's, So I thought I would share with you!

First*  Pick out your elastic, and the fabric ( Tulle, is what its called ) you would like.
Second*  Cut the measurements. (I got 5 yards of each color I used.)
Three* Cut into strips, now this you have to decide if you want it long or short. I did mine long so I cut the strips longer. I used this tool, Which was SO much easier than using Scissors.. but, Dont panic, can still use scissors if you need to.. it gets the job done!
 Fourth* Sew your elastic together
  Fifth*  Start putting your fabric on your elastic.Now, its pretty simple to do, all you do is fold your fabric in half, then put the closed part under your elastic and pull the loose ends through the closed end and pull.
You will then have a beautiful tu - tu made!!!! Easy, Cheap, and fun!!!! And girls of ALL ages LOVE them!!!

The colors are a little hard to see, but dont let the hippy couch distract you! :)!! Happy Tu-Tu making!!! and Good luck!!!
*Tasha Bracken

Thursday, May 5, 2011

simple bow.

if you can crochet this is a SUPER simple bow tutorial. 
if you can't crochet, youtube it...it's that simple. 

Just make a tiny little rectangle, pinch the center together, 
and wrap with extra yarn..hot glueing to finish off in the back.
Then I crocheted just a single strand for the headband and looped
it through the center piece of the bow on the back. These are super pretty and 
girly..and SO easy.

Thursday, February 17, 2011

Tutu's for your tiny Dancer

ITEMS NEEDED:
*Toole - Any color, depending on size plan on about 1.5 yard
*Sharp Sissors
*Measuring tape
*3/4 inch Elastic Band
*about 1 hour (or less) Time

Click on pics for step by step how to!


Tutu's for your lil one or YOU!  :)

Wednesday, February 16, 2011

Super Soft baby girl Headbands

I call these:
Nylon Super Soft Baby Girl Headbands
So easy, all you need:
*knee high nylons (small, any color.) - for the Band
{you can get 2 headbands from 1 pack}
*any fake flower (with plastic parts removed) and
*some type of jewel center - for the flower center
*Hot glue/gun
*needle/thread or sewing machine

Here's How to Put it all together:
1-Cut off top of Knee High (the 1-2 inch seam on top)
2-Stitch toes of nylon to the unfinished top.
3-wrap around the previous stitch, the 1 to 2 inch seam you
cut off in step 1. Sew to give finished look. See pics above.
4-Hot glue on any embellishments.
*ALL DONE*

Use the code STMMMS84668 to get $10 off instantly!
Related Posts Plugin for WordPress, Blogger...