Photobucket Photobucket Photobucket Photobucket Photobucket
Showing posts with label sewing. Show all posts

Thursday, July 25, 2013

DIY Minky Tag Blanket


Quinn is finally getting to the 'toy' age! It's so fun to watch her discover new things and play with anything and everything she can get into those chubby little fingers!

I've had the supplies to make this taggy blanket for quite awhile now, as in, I bought it all when she was like 5 days old! But it's taken me this long to get around to it! ;) I don't know why either? Maybe because until now, I knew she wouldn't have much interest in it!
Oh and just a warning... this was my very first time sewing with Minky fabric... so don't judge me too harshly! ;)

You'll need...
2- 13x13 squares of Minky fabric* ( I think I got 1/3 yd and had lots leftover)
Around 40 strips of ribbon, 4 inches long. I used 36 strips, but some of mine were the 1 inch ribbon, so those took up more room.
Pins and a sewing machine.

1.After you cut your fabric and all your ribbon, fold each piece of ribbon in half, and pin it to the right side of one of the minky squares, facing IN.
 2. Sew all the way around the minky, attaching the ribbon strips to one of the minky squares.
 3. Pin the other square of minky on top, right sides together, and pin pin pin!! Leaving about 2 inches so you can turn it around. Then, sew all the way around, sewing both squares together, with the ribbon in the middle.
4. Then, flip the blanket rightside out, through the 2 inch hole that you left open.
5. Sew around the edge. (This is the part where you don't judge me)

 
AAAAND... you're done! ;)
This really was an easy project! It's not PERFECT... but, it's for a 3 month old ;) I don't think she'll mind one bit. 

*Side note: I think looking back, I wouldn't of done both sides minky... I would of done one side with flannel, or even cotton. I'm pretty sure it would of been easier to sew.
 

Wednesday, January 16, 2013

DIY Felt Heart Garland

I've had my Valentines decor up for some time now actually! In fact, the day after I took down Christmas I pulled it all out!
If you are on Pinterest, chances are, you've seen this garland (or one like it) all over the place! They've become quite popular! And for a good reason, they are very easy to make!
Step 1. Choose your felt. Now, lets talk felt for a second... if you were to ask me which felt to buy a month ago, I would of told you to just go pick up the cheap stuff from walmart and you'd be fine. I will not tell you that now however. Wool felt people. WOOL. Yes, its a tad more pricey, but if you can find it, it's softer, its not so puffy, it cuts a million times easier and it doesn't fray. I got mine at Joannes next to the regular bulk felt. I think I payed like $1 for 1/8 yard.
Anyways, so as you can see, I chose red, grey and white.
Pin your fabric over about an inch and a half (NOT exact, just guessing) and go ahead and cut hearts to your hearts content!  (pun intended)
I think I cut like 25 in all or something.
 Once you have all your hearts cut, bust out your sewing machine. Or, if you are like me and have been doing countless baby girl projects, it will already be set up on your kitchen table :)
 
 Take your first heart, and sew a straight line down the center, then, when you are almost to the edge, grab your next heart and start feeding it through immediately behind it. It take a little pushing, and once in awhile I had to lift the machine foot to get it under there, but it's really quite simple after you get the hang of it!
Then just repeat with all your hearts!


Thursday, October 25, 2012

DIY :: Receiving Blankets

I have a really awesome Mother in Law! When I was pregnant with my first, she made me oodles of blankets for the little man! From quilts, to wraps, and everything in between. These, however, were by far my very favorite! They are a lot larger than the generic store bought blankets you can buy at Target or Walmart, and perfect to use as a swaddling blanket, nursing cover, car seat canopy, ground cover, and SO much more! And bonus... they cost around $3.50 a piece!
All you need is 1 1/4 yards of flannel per blanket. I bought my fabric at Joannes, regular price it is $6.99 a yard, but this week it was on sale for 50% off. Score! But if it's not, be SURE to use a coupon! They always have 50% coupons out! I am not a huge fan of the cutesy nursery prints, so I keep on the lookout for funky styles.
Once you have your fabric, it's really pretty simple from there... all you do is serge around all 4 edges! That's it! See.. I told you it was easy! And if you have an awesome Mother in Law that offers to do it for you, even better! :) That would be the reason I have no 'during' photos ;)
But really, these make great gifts, and they are so much nicer than the dinky store bought blankets! Especially if you pop out 9.4 lb babies like I do, that wouldn't stay swaddled in a tiny blanket if you wanted them to!
Here are a few more that are in waiting!

Tuesday, March 29, 2011

Drip Dry Bathtub Bag

This was SO easy to make! and it cost me a whole .50 cents!!!


you need...


1/2 yard fabric netting (it was $1.99 a yard at joannes, then use the 50% coupon form their mailer)


1 shoelace


sewing machine


fold your netting in half and sew up both sides.


fold down the open end a few inches and sew all the way around the top to create a tube to string the shoelace through.

cut a hole in each end and sting the shoelace through, tie the ends together and pull top closed :)

Wednesday, March 2, 2011

Self Binding Blanket Tutorial


These are my favorite blankets for babies, either to wrap them up, cover a carseat, or give as a gift. They are super easy to make. I won't post the entire tutorial here - because it's long with lots of pictures. If you want to view it and download a PDF visit my blog Megan Poulton Designs. :)

Wednesday, February 16, 2011

Super Soft baby girl Headbands

I call these:
Nylon Super Soft Baby Girl Headbands
So easy, all you need:
*knee high nylons (small, any color.) - for the Band
{you can get 2 headbands from 1 pack}
*any fake flower (with plastic parts removed) and
*some type of jewel center - for the flower center
*Hot glue/gun
*needle/thread or sewing machine

Here's How to Put it all together:
1-Cut off top of Knee High (the 1-2 inch seam on top)
2-Stitch toes of nylon to the unfinished top.
3-wrap around the previous stitch, the 1 to 2 inch seam you
cut off in step 1. Sew to give finished look. See pics above.
4-Hot glue on any embellishments.
*ALL DONE*

Tuesday, February 8, 2011

fabrics. GALORE.


fabric worm is my favorite fabric online store. 
They are all unique. They can be pricey, but like everything..if you look
you can find some awesome steals. My friend made sophs bedding out of fabric
bought from this store. {which we ADORE} 

check it out. 

Thursday, February 3, 2011

Does your lil man need Ties??

Forgive me for being m.i.a. lately, we've had some terrible
virus hit our house hard! So needless to say, being a mom
to 2 awesome sick kids, and being somewhat sick myself,
I was pretty down and out for a bit.
BUT I'm slowly getting back into action.
Starting with these Awesome ties for your lil' guy!
This is my lil' Logi-bear modeling the first tie I've ever made!!
Doesn't he look so adorable!?
This will be his 'Super Bowl Sunday' tie!
Thank you to AMBER over at 'Very Homemade'.
She is so crafty, and has a few tutorials on some other awesome
projects that I can't wait to try soon!! (headband anyone?! ♥)
Just follow this link and use her directions, because they
are very easy to follow. Thanks again AMBER!!
It took me longer than 30 minutes, but well worth the time!
Also, when getting your material, check out
Joann's Fabrics and Crafts..I found that they sell
1/4 yard material already cut out to use!! AWESOME!!
Anyway, ENJOY!
*Leave a comment with a link to your creations!!

Thursday, January 13, 2011


Ok Ladies, here's an attempt to show my sewing skills. :)
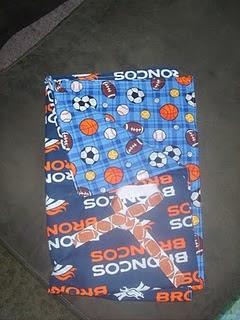
This past July (6 months ago, I can't believe my baby is 6 months old) I was blessed with a handsome lil' man. Sadly, he is the 2nd child, and our first was a GIRL. So everything we have is PINK!! And since I can't do what I'd like to do, go out and buy all new boy things, I had to improvise. Pink Car seat now, but Denver Broncos/sports balls Car seat Canopy Cover will help it be a bit more manly for my lil' guy.
I just followed the tutorial from this site. It was so super easy! Anyone can follow it, in fact I've made several to give away as gifts!! :)
Happy Sewing, ladies!

Use the code STMMMS84668 to get $10 off instantly!
Related Posts Plugin for WordPress, Blogger...