So awhile ago I did this post, and while I use that list often... it still doesn't solve the DECISION of whats for dinner. So, I made yet ANOTHER list. :) This one hopefully though, will help the decision making process go much quicker. I took each day of the week, and gave it a theme (with a few examples).
Monday: Italian (spaghetti, alfredo, lasagna)
Tuesday: Mexican (tacos, enchiladas, burritos, loaded nachos)
Wednesday: BBQ (grilled chicken, steak, pork chops)
Thursday: Sandwiches (grilled cheese, hoagies, grilled chicken sandwiches)
Friday: Burgers (mushroom & provolone, bbq bacon, big mac)
Saturday: Pizza (BBQ chicken, pepperoni, veggie, ham & pineapple)
Sunday: Whatever sounds good
You get the basic idea right? I'll switch it up every week, but now I have a guideline of what to choose for each meal :) Hopefully this idea will help some of you with your 'whats for dinner' dilemmas!


Wednesday, March 30, 2011
Lyndy Butler
 I just have to give a shout-out to my SUPER talented step-sister! She is coming out with her first CD and needs help! Go here to take a listen to her music! she is UH- MAZE-ING! go here to like her on facebook! go here to view her blog! and then go here to help her get her CD finished!
 ps. be sure and listen to 'the dream' I can listen to this song a billion times in a row! it is such a sweet song! and not like "dude. thats sweet", its like "aaw! thats so sweet"
Tuesday, March 29, 2011
Easy Fruit Dip

1/2 cup vanilla yogurt
1/4 cup applesauce
strawberries, bananas, peaches or any other fruit
Mix applesauce and yougurt together, and dip with fruit.
Drip Dry Bathtub Bag
 This was SO easy to make! and it cost me a whole .50 cents!!!
 you need...
1/2 yard fabric netting (it was $1.99 a yard at joannes, then use the 50% coupon form their mailer)
1 shoelace
sewing machine
fold your netting in half and sew up both sides.

fold down the open end a few inches and sew all the way around the top to create a tube to string the shoelace through.
 cut a hole in each end and sting the shoelace through, tie the ends together and pull top closed :)


Monday, March 28, 2011
Tot School Ideas
I have been attempting to do Tot School with Katelyn each day. I have always wanted to do something with my children to help teach them. I got the idea from following several blogs, but mostly from three amazing ladies who have so many ideas. All three of them have been either kindergarten or first grade teachers so I know that their 'curriculum' is age appropriate and educational. First off is 1+1+1=1. She has such brilliant ideas and tons of free printables and suggestions. I am so excited to start using her ABC weekly lesson ideas for Katelyn.

I also follow Alison from Oopsey Daisy. She has great ideas and also does her version of mommy school with her 2 year old little boy. This last week she offered a new themed packet that I am so excited to use with Katelyn.

And finally for more great {free} printables and ideas you can visit Michelle of Musings of Me. She has so many adorable themed Tot School printables - they are wonderful! I have used several of hers and we have enjoyed them.

I also follow Alison from Oopsey Daisy. She has great ideas and also does her version of mommy school with her 2 year old little boy. This last week she offered a new themed packet that I am so excited to use with Katelyn.
And finally for more great {free} printables and ideas you can visit Michelle of Musings of Me. She has so many adorable themed Tot School printables - they are wonderful! I have used several of hers and we have enjoyed them.
Thursday, March 24, 2011


Monday, March 21, 2011
Fresh Food Feeder Product Review

I saw these at target when I was pregnant and figured for a couple bucks it would be worth a try someday! Well the other day I finally broke it out! Blake LOVES it! all you do is stick fresh fruit/veggies in the mesh bag, close the lid and let them chew on it! all of the mushy stuff comes out, while the chunks stay inside so they wont choke on any big pieces! Ive tried carrots, peas, banana and ice so far, I am also going to try teething biscuits (because my baby likes to break them into chunks) sweet potatoes, steamed apples/pears, peaches and avocado soon! They are such a great product! Blake will suck and chew on it while I am making dinner, it keeps him entertained for a long time, which is a TON of help!

cork board makeover.
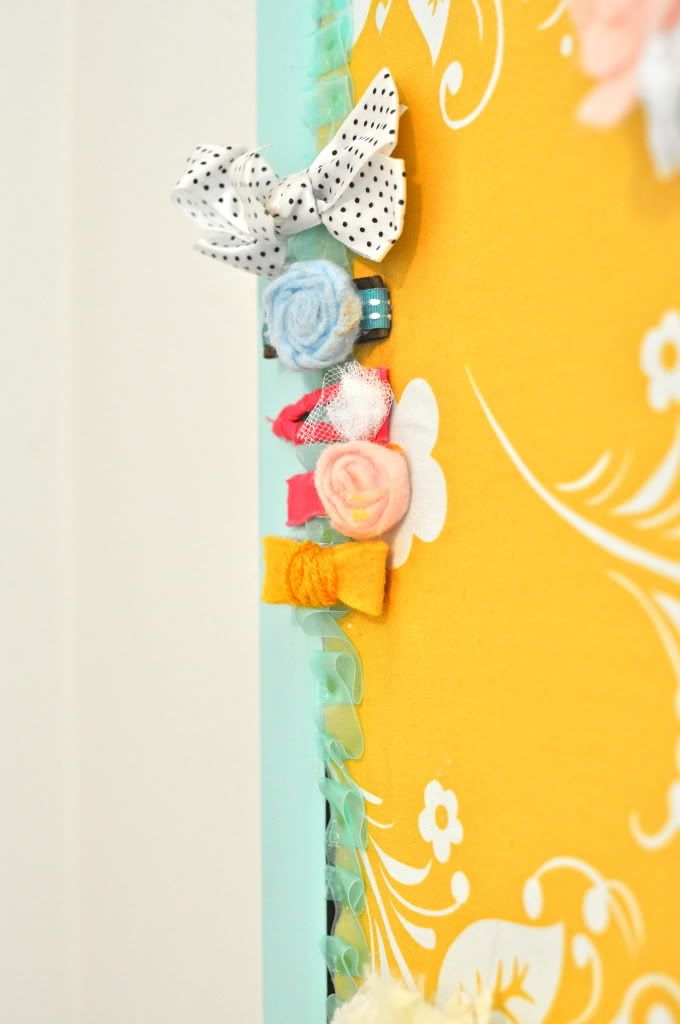
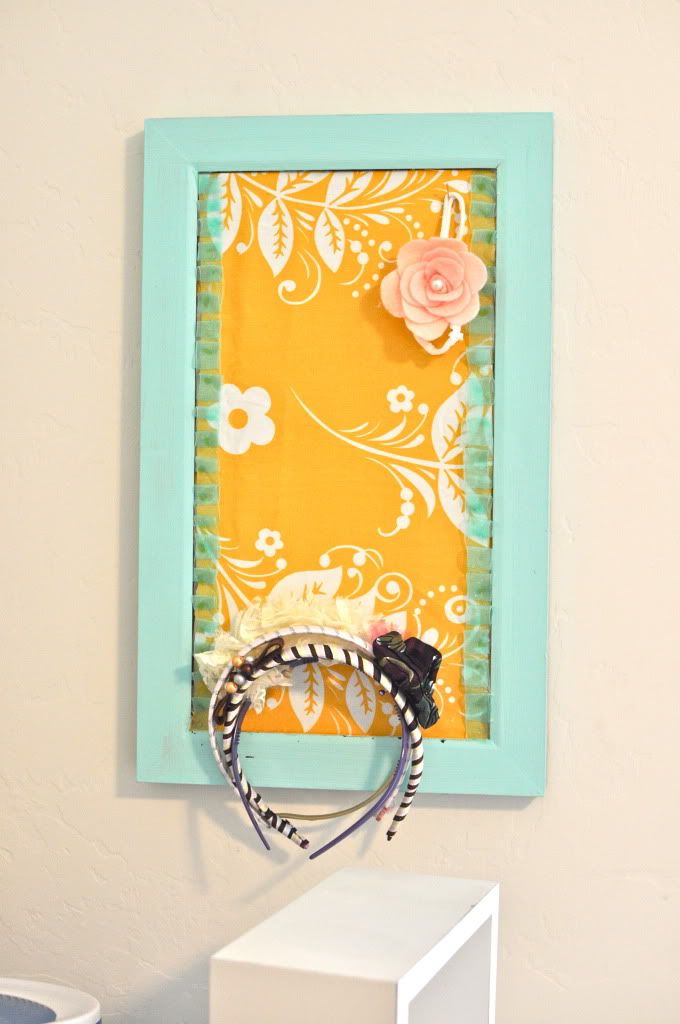
{click link for tutorial and her CUTE boards.}
I found this on the website, How Does She.
I fell in love. I had this old cork board in sophias room
that I have always hated. I painted it yellow and added those
twisted roses to it, but it looked terrible. I found the tutorial above and
was sooo happy. I added the little pleat things on the side to hold her clips..
since we aren't into headbands much anymore. {rips them right out}
I am re-doing my daughters room, same colors and everything
but making it more 'big' kid like. {5 more months until my baby turns 2!!!}
This was the perfect start to her baby, turned big girl room, makeover.
{ps. don't you love that her bows are stained with mac n' cheese?! ooh the life
of a 1 year old..not even CLOSE to clean.}
miss plunketts
Have your heard of Miss Plunketts around town? These are the cutest interchangable hair accessories ever! They are perfect for your little girls and for yourself! and the best part is you only buy one of what you like and you can switch them all around! GO towww.missplunkettboutique.com to look and the shop and see what fits for you!
Fashion 2011
I am an instructor at Taylor Andrews Hair Academy and one of the classes I taught this last week was the Fashion Trends for 2011. Thought I would share the good news!


From the edgy styles, to the elegant night on the town, to just roaming around the house there is a 2011 style for you..
if your like me and live on the wild side of the hair spectrum this style will be for you..
RED! Red is huge this year,if your wanting to stand out you will go red. Even if you just put in a splash of red.
Your elegant night on the town will consist of a loose up-do.
Volume is still in.. and will always be in.
Sleek and Shiny with hair close to the nape are going to be a huge part of this years spring/ summer look along with the "new head band" which consist of winding rolled scarfs over your hair. Low pony's and knotted buns are also going to be showing themselves this year.
Extreme side parts.
BRAIDS. Let just talk about how big braids are. They were pretty big last year and from what the New York Fashion show runways looked like they are going to be even bigger this year. (too bad my hair isnt long enough to really braid :( )
Ok enough about the styles.. let talk my favorite thing as a stylist.. COLOR
Dimension is in. If you are an all over one color, consider highlights, or panels, or anything to add dimension to your hair. Its going to give you more movement, and fun!
IF your a blonde, try the more natural approach. Your going to want to add some gold tones, or a neutral tone to your hair.
IF your a burnette your going to want a deep and rich color with a few low lights, or a splash of color like red, or a blonde panel to add dimension. This look is going to suit all ages!
IF your more a red head kindof gal your going to want to make sure you tell your stylist to mix the right amount of a bright red with a deep rich red also, to make a bold point.
Well now you have it! if you are looking to do any of these trends and dont have a stylist yet, let me know I would be happy to help you! if you have been looking for a change then consider any of these looks..
(and if you love your hair just the way it is, dont change it.. i am a BRIGHT blonde all over with a splash of red through my bangs.. i am not your natural looking blonde.. but i am confident about my hair, and have at least the red going for me :) )
Sunday, March 20, 2011
spring cookies.
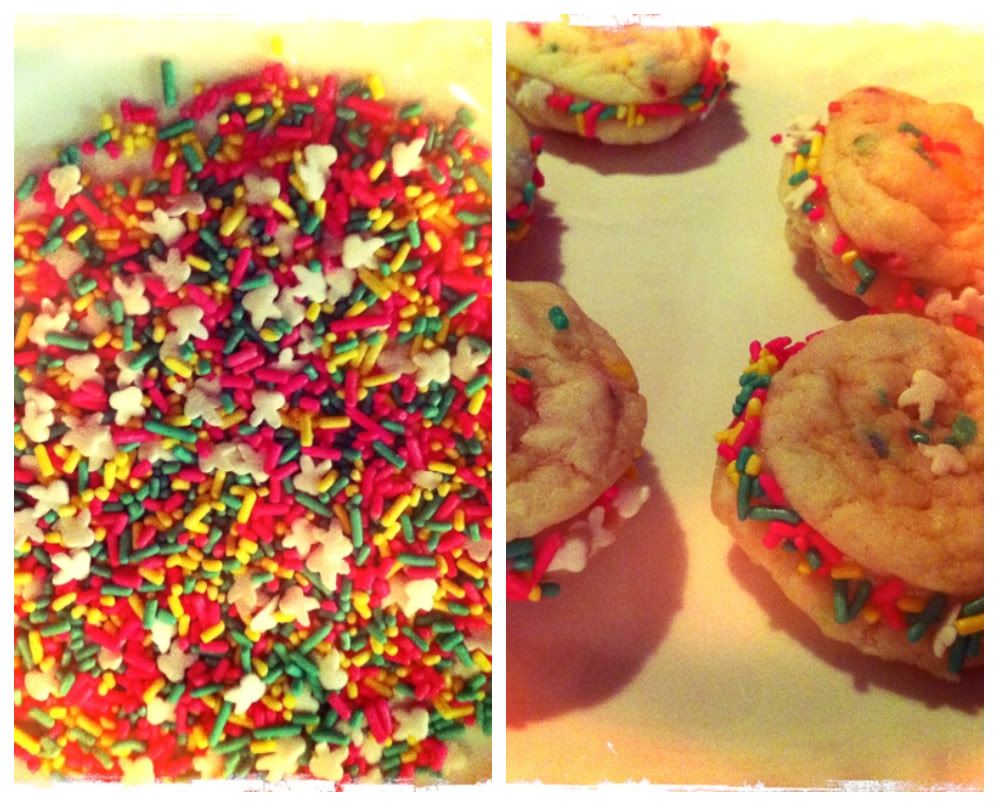
cake batter cookies.
cake mix, of choice.
{i used funfetti for these ones.}
1/3 oil
2 eggs
1/3 oil
2 eggs
375 degrees preset on oven. mix together cake mix, oil, and eggs.
spoon onto ungreased baking pan, i did mine half a spoon for little
cookies. bake 6 to 8 minutes, until barely golden brown. {I leave them
on the pan a few minutes until cooled when they get out, this 'cooks'
them a little more and makes it easier to take off the pan.} Then mix
any type of frosting together, and put on bottom part of one cookie. and then
add another cookie to the bottom. Making a sandwich. roll the frosting
that is out into some sprinkles
and voila! coooookies!
Saturday, March 19, 2011
Strawberry Cupcakes & Limeade Slush

I made the yummiest strawberry cupcakes with cream cheese frosting for my little sister's bridal shower a few weeks ago.
Ingredients:
- White Cake Mix
- 4 Eggs
- 1 C. diced Strawberries
- 1/2 C. Oil
- 1/2 C. Water
- 1/2 - 1 C. Flour
- 1 large package of Strawberry Jell-O

I also made Limeade Slush! Wow - I will definitely make this during the summer for something delicious and cold!
Ingredients:
- 1 Can Frozen Limeade, slightly thawed
- 1 C. Sugar
- 8 C. Water
- 1 liter of Lemon-Lime Soda
To assemble, pull the limeade slush out, and slightly thaw. Break up slush in a punch bowl or pitcher, pour lemon-lime soda over and serve! Garnish with sliced limes and lemons.
Thursday, March 17, 2011
Creamy Peach Smoothie
 1/2 cup low fat vanilla yogurt
1/4 cup low fat vanilla ice cream
5 slices frozen peaches
1/2 of a banana
splash of milk
throw everything into a blender and blend until smooth. if you want is icy-er- add more ice cream, smoother- add more yogurt, fruitier- add more peaches.
ps. dont you love that jar!? my mom gave it to me with homemade jam, but I loved it to much to just stick it in the cupboard!
Tuesday, March 15, 2011
easter time.

making this soon. great spring/easter project.
found HERE.
check out both of these blogs. they are GREAT!
Spring Cleaning Checklist

I LOVE spring! Everything is so clean and new and fresh. I'm kind of excited to start spring cleaning this year, because its our first year owning a home! And is it just me, or is it way easier to take care of something that you own yourself! Anyways, I made myself a checklist this year so I wouldn't get off track, and I thought I'd share! I copied and pasted it on here so you would be able to paste it into a word document and change it to meet your needs. I realize this is a lot, but I am giving myself a month to do all of it, so I don't think it will be too hard! Hopefully this helps you kick off your spring cleaning!
(I realize all of these might not apply to everyone, but this was just what I needed to do in my house, you can add and take away things as you please!)
- Dust EVERYTHING. Fans, plant shelves, lights, decorations, clocks, etc.
- Wipe down all doorknobs, light switches and power outlets.
- Walls. Spot clean and touch up paint where needed.
- Bathroom cabinets/drawers. Pull EVERYTHING out, wipe down inside of cabinet, sort contents into keep vs. toss, and organize keep pile back into cabinet/drawer.
- Kitchen cabinets/drawers. Pull EVERYTHING out, wipe down inside of cabinet, sort contents into keep vs. toss, and organize keep pile back into cabinet/drawer.
- Baseboards. Vacuum and Wipe down with a damp rag.
- Doors/doorframes. Vacuum and wipe down all with a damp rag.
- Dust and wipe all air vents.
- Clean ALL windows; glass, casing and sills. Dust, wipe down, windex.
- Clothes Closets. Pull EVERYTHING out, dust/wipe shelves, sort clothes and shoes into keep/donate/toss/store piles, and organize everything back into the closet.
- Linen closet. Pull out all towels/washcloths, toss any that are frayed/discolored/faded. (keep a few for garage towels)
- Pantries. Pull everything out, wipe down shelves, sort contents into still good/expired. Toss expired and organize all good food back in.
- Pull out fridge, vacuum and mop behind and underneath.
- Pull out washer and dryer. Vacuum and wipe underneath, behind and all surfaces.
- Defrost the deep freezer. Toss any expired food.
- Couches. Tip over, vacuum underneath. Vacuum under cushions.
- Wash ALL bedding, blankets, quilts and rugs.
- Wash shower curtains and replace plastic curtain liners.
- Spray house for bugs
- Empty Filing cabinet, sort into keep/toss.
- Pressure wash the house.
- Clean patio furniture.
- Clean BBQ.
Wednesday, March 9, 2011
Chicken Fried Rice

2 cups uncooked rice
1 chicken breast, cooked and cut into a small dice (I just used leftover chicken, or you could also use pork/ham)
3 eggs scrambled and chopped into small bits
Veggies (I used 1 cup cabbage, 1 cup frozen peas and 1 cup chopped broccoli. Other options are carrots, green onion, sugar snap peas, cauliflower, etc.)
1/4 cup melted butter or margarine
2-3 TBS Soy sauce
2-3 TBS Teryaki sauce
1 tsp Garlic powder
1/2 tsp Crushed red pepper flakes (optional)
In a little bit of olive oil, saute your veggies until tender. In a separate pan, cook rice and add to the veggie mixture. Scramble your eggs and set aside. To the rice, add melted butter, soy sauce and teryaki sauce (you can add more if needed after tasting) Add your eggs last and cook for 1-2 more minutes.
You can also leave out the meat and use this as a side dish.
Tuesday, March 8, 2011
Quick and Easy Tartar Sauce

(not my photo... got it off google, and now I cant find it again to site it)
The other night we went to Red Lobster for dinner. We had
lots of leftovers which we took home, and wouldnt you know it... our tartar
sauce had been expired for almost 6 months. So... I made some! I had all the
ingredients at my house, so it was really easy!
1/2 cup Miracle Whip
3 TBS sweet relish
1/4 tsp lime juice (or lemon, whatever you have)
1/8 tsp garlic powder
1/8 tsp black pepper
1/8 tsp kosher salt
1/8 tsp red pepper flakes (optional)
1 tsp onion flakesMix and let it set in the fridge until you need it. Overnight is best, but you can eat it right away.
Thursday, March 3, 2011
Steak Fries

3 Russet potatoes cut into wedges
1 TBS olive oil
2 tsp kosher salt
2 tsp steak seasoning
place the potatoes in a gallon sized ziploc bag. Add olive oil, salt and steak seasoning to the bag, and toss/rub/shake until the oil and seasonings are evenly covering the fries. If it doesn't seem like they are getting evenly coated, add a little more olive oil. Bake at 475 until fries are golden brown and crisp on the outside (ABOUT 20-30 min depending on the size of your fries). These are SPICY! if you don't want them that hot, use 1/2 tsp of steak seasoning, or none at all!
Wednesday, March 2, 2011
Self Binding Blanket Tutorial
![]()
These are my favorite blankets for babies, either to wrap them up, cover a carseat, or give as a gift. They are super easy to make. I won't post the entire tutorial here - because it's long with lots of pictures. If you want to view it and download a PDF visit my blog Megan Poulton Designs. :)
Tuesday, March 1, 2011
Plate Makeover
Did you know you can spray paint plates? Well you can!! :) I spent forever this weekend looking for new plates for the plate rack above my dining room table, and came up with nothing (well, nothing that costed less than $8 a pop!) However, Tai Pan had some funky looking ones, and for .99 cents, I figured it was worth a shot to give them a makeover!
they started out like this... not bad, but from some angles they turned blue...?

i gave them a little sanding to take off a bit of the gloss

picked up some of my FAVORITE spray paint

this is honestly the ONLY brand of spray paint i will ever use. EVER.
gave them a good 2-3 coats

distressed the edges
 set 'em up... and decided they were too plain :(
 but that can always be fixed :) (vinyl is always the cure isnt it) ;)
 I LOVE how the green turned out! They add so much color to my house! :)
Yay for spray paint!
Subscribe to:
Posts (Atom)

Use the code STMMMS84668 to get $10 off instantly!