Photobucket Photobucket Photobucket Photobucket Photobucket

Thursday, July 14, 2011

Rice 101

I have a rather embarrassing confession... until about a month ago, I had never cooked rice. I had cooked minute rice, and rice-a-roni. But not just plain ol' white rice. But guess what? I looked it up online... and IT'S EASY-PEASY! Wanna know how?
Heat 1 1/2 cups of water to a boil. Turn heat down to the lowest setting and add 1 cup of rice and 1 tsp of margarine. Stir ONCE. Cover and let it hang out for 20 minutes. VOILA! You have perfect rice!
Did you know something else? You can FREEZE cooked rice? Who knew!? Oh. You knew? Well I didn't! But it's my new favorite thing to do! After the rice has cooled, scoop into Ziploc baggies and push all the air out. lay flat in the freezer. And when you want to thaw it, just pop the bag in the microwave for like a minute! AMAZING! Needless to say I've recently been using the 10lb. bag that has been sitting in my pantry for, oh I don't know... FOREVER!?
Whoever let me think I needed that much rice to make rice bags... was not my friend.

Tuesday, July 12, 2011

We've Been Featured!

Go check out the Make Ahead Meals for Busy Moms blog to see my guest post on freezer burritos!
 

Monday, July 11, 2011

Sloppy Joe Calzones

This is the perfect recipe for one of those 'no-time-to-cook' nights! They are SOO yummy, and fast!
If you already have the sloppy joe meat in the freezer, it takes 5 minutes to prepare and then just bake!
Sloppy Joe Calzones
makes about 4 calzones
1 cup sloppy joe mixture thawed (recipe below)
1 tube refrigerated biscuits
1/2 cup shredded cheese

Flatten biscuits into a wide oval, and fill with a spoon full of the meat. Top with a pinch of cheese, fold over and crimp edges together with a fork. poke holes in the top to allow the steam to escape and bake according to the biscuit package directions.


Sloppy Joe Meat for the freezer
1 lb Ground Beef
3/4 cups Ketchup
4TBS Worchestershire Sauce
1/8 cup Mustard
1/8 cup Vinegar
1/8 cup Sugar
1/4 teaspoon Salt
1/8 teaspoon Garlic Powder
1/2 small onion, minced
In a skillet, cook ground beef and onion until beef is evenly brown.
Drain beef.
Add remaining ingredients to the skillet and stir well.
Cook covered on low heat for 30 minutes, stirring occasionally.
Divide the meats into sandwich baggies in 1 cup portions, lay flat and freeze!
When you are ready to thaw the meat, microwave on 1/2 power for 30 seconds at a time, until completely thawed.

Sunday, July 10, 2011

FONT-tastic

I have a slight (huge) addiction to fonts. I honestly have hundreds on my computer. There is nothing more exciting than finding a cute new font :) I only have one rule about fonts... dont pay for them. There are SO many free fonts out there, that it's pointless to buy them. Here are a few of my favorites (or most used)-
1. Cutie Patootie-I love this font for scrapbooking and normal type. It's readable, but still cute!
2. Little Days-I use this a lot! It's my favorite cursive font, I use it for photography and digital scrapbooking.
3. Vaguely Fatal-This is a great 'manly' font! I use this one a ton for announcements and other things for guys.
4. Delouisville-This font is great for printable decor and headers.
5. Calvin and Hobbes-SUPER fun font for little boys! I use vinyl and this font to label everything in his room!
6. Sandra Dee-LOVE THIS FONT! It's just the right amount of simple and cute-sy at the same time!
7. Sugar Noodles-This is a new ultimate favorite of mine! I've been using it on everything!!
8. Devon Caps-This is another 'manly' font that I really like! but it's not too manly, so it works really well for anything!
9. Cicle-This is my go-to-simple font. If I want something that looks clean and neat, I use this font.
10. Trajan Pro-I love this font for vinyl! It's very sophisticated and simple, but its a little fancier that the basic Times New Roman.
11. Rustler-Alright, another 'boyish' font. But this one I use for a lot of different things! It's such a fun one!
12. Windsong-This is a pretty font! Perfect for all your fancy writing needs! :)
13. Brandywine-This is another font that I use a lot for vinyl. Its a really great all purpose font.
14. Birth of a Hero-Grungy, yet readable. enough said.
15. Pea Hollee-This is the handwritten font I use the most. I am a bit wary of most handwritten fonts, but I love this one!

How have I come to acquire all these fonts for free you ask? These 4 wonderful websites have supplied me with 99% of them. If there is ever a font you want, and cant find on one of these... google it. You'll find it out there somewhere!
http://www.sugarfrogfonts.com/ (newly found FAVORITE!)

Happy Typing!

Visit HERE to learn how to install fonts!

Thursday, July 7, 2011

Grilled Honey Mustard Chicken

Has anyone noticed that it is WAY too hot to turn on the over lately!? So what do you do when you cant cook inside? You grill!
Grilled Honey Mustard Chicken
1 Large chicken breast, pounded to 1/2 inch thick
1 TBS Spicy Southwest Mustard (or Dijon)
1TBS Honey
1/2 tsp kosher salt
1/4 garlic powder
1/4 tsp paprika
red pepper flakes (optional)

Mix all ingredients and pour over chicken. Allow to marinade for at least 20 minutes. Grill on the BBQ until inside is no longer pink.

And if you're looking for the perfect BBQ sauce to dip this chicken (or ANY meat for that matter) in?

this is the BEST BBQ SAUCE EVER! I put it on anything and everything! Not even joking you. Go buy it. It

Wednesday, July 6, 2011

DIY/pinterest.

I love pinterest.
I love how organized I suddenly
feel with all the projects I want to do
someday. 


Here are a few I hope to accomplish this
month. easy, affordable, fun, and things
that will make my house look purdy.

<--first project. I am wanting to do some kind of canvas art for sophs room. but they don't have backs....and then i found this brilliant idea!
Now I can put the canvas art on her walls. Genius!


<--Next, the DIY anthropologie letters. So easy, so cheap and so pretty. I can't wait to copy this and put it in my kitchen. I'm needing some pretty kitchen love right now.


<--With fall somewhat around the corner, i've started looking for a pretty fall wreath. I just want simple, pretty, and cheap...and i'm thinking that this covers all 3. It could possible count as my winter wreath as well...win win!


Check out all my DIY pinterests HERE.

Nectarine Shortcakes

I walked by the produce isle while I was grocery shopping the other day and I smelled FRUIT! Peaches, and nectarines, and all that other yumminess! So I picked up a few and made this little beauty for dessert last night! It was really fast and yummy!
Nectarine Shortcakes
Refrigerated biscuit, baked and cooled
Vanilla Ice Cream
1 nectarine, sliced
cinnamon

After you slice the nectarine, sprinkle with a pinch of cinnamon, stir to combine and allow to sit while you assemble the rest.
Split the biscuit in half and add a scoop of ice cream to the middle. Top with the nectarine slices and the other half of the biscuit.
ENJOY!!

Tuesday, July 5, 2011

LLS is on Facebook!


Best Salsa EH-VER

This is the ULTIMATE salsa recipe! It's fast, easy, and you seriously usually will have everything for it in your pantry! It's a lot like restaurant salsa!
2 - 14oz cans of crushed tomatoes
Half of a large yellow onion
2 hot chili peppers (the yellow ones in the jar)
1tsp salt
1/2 tsp pepper
1 tsp garlic powder

Throw everything into a blender, blend to the consistency you want and enjoy! It gets better over time, so if you can let it sit overnight, that's great, if not that's okay too!

Fried Chicken Sandwich

1/2 of a chicken breast pounded to about 1/4-1/2 inch thick
1 egg white+1tsp water
1/2 cup bread crumbs + 1tsp garlic powder
1 TBS mustard mixed with 1 TBS Miracle Whip
1 slice provolone cheese
Sandwich toppers (Lettuce, tomato, onion)
A big chunk of French Bread, split

Dip the chicken into egg and then into bread crumb mixture. Place onto a cooling rack ON a cook sheet (so the chicken doesn't get soggy on the bottom) and bake at 350 for about 15-20 min, or until the chicken is no longer pink inside. Spread the french bread with the mustard spread and add chicken, and any other toppings. Top off with the other 1/2 of the bread and enjoy! :)

Wednesday, June 29, 2011

our {SUMMER} list

These Summer 'Bucket' lists are EVERY-WHERE in blogland lately! So here is ours!
We sat down as a family , okay so just me and my husband, a 9 month old wouldn't of had too much input ;)
We wrote down all the things that we always thought would be fun to do, but had never gotten around to! It really only took maybe 20 minutes to come up with this list! Then I printed it, slid it into a page protector (with the side cut off), stuck a few magnets on the back and hung it on the fridge! I'm REALLY excited to start checking things off of the list! This weekend hopefully we will start with the Zoo and eating at a new restaurant!

Tuesday, June 28, 2011

Cupcake Fondue.

I found this on my Pinterest and i'm in love with the 
whole concept. Simple. Fun. and Yummy.


pictures and how-to's VIA How Sweet Eats.

Monday, June 27, 2011

Pork & Rice Bowls

This is a super fast and easy lunch if you already have the rice cooked (I had leftovers) and a pork chop precooked. And it's SO yummy! Add any veggies you want... this is just an 'inspration' recipe!
2 cups cooked rice
sliced pork (I used a leftover porkchop)
1 cup broccoli florrets
1/2 cup peas
3 TBS soy sauce
2 TBS teryaki sauce
1 tsp chili sauce (optional- this makes it spicy!)
1/2 tsp garlic powder
1/4 tsp onion powder
After you cook the rice, slice the porkchop into pieces, and add all the ingredients into a pan and heat until vegtables are heated through. I never measure my seasonings, so those are just guesses, add more to taste.

Saturday, June 25, 2011

Double Duty Beef & Bean Burritos

Burritos are a staple at our house! I used to buy the prepackaged bean and cheese burritos, but they were always so dry, so I stopped. But, I missed the convenience of them, so I decided to make my own!
One night I was making Beef and Bean Enchiladas, and I had leftover filling, so I decided to try making them into regular burritos, and freezing them. IT WORKED! like REALLY well! I was very (and pleasantly) surprised! It's definitely something I will do again!

You need...
Flour tortillas (I used 7, but it depends how full you fill your burritos)
1 can fat free refried beans (use fat free, they are a little stiffer)
1/2 cup precooked ground beef
1/2 can corn (optional)
1/4 cup shredded cheese
1 can enchilada sauce (if you are making the enchiladas)

In a bowl, combine beans, beef, corn and cheese and mix well. Spoon into the tortillas and roll them up tight (with ends TUCKED IN!).
 If you are doing the enchiladas, place them in a dish and cover with enchilada sauce and a little cheese. Bake at 400 until sauce is bubbling and cheese is melted.
If you are only making the frozen burritos, roll the burritos tightly in plastic wrap and lay flat in the freezer. To eat, unwrap from plastic wrap, rewrap with a paper towel and microwave for 1-2 minutes until heated through.
SO EASY! You can fill these with pretty much anything! Just make sure you don't put anything you don't want heated inside! (lettuce, sour cream, etc.)

Friday, June 24, 2011

My scrap wood collection

On the last post I did, I got asked about my 'scrap wood'. So I thought I'd give a little insight into how I came about all these chunks of decorating soon-to-be's.
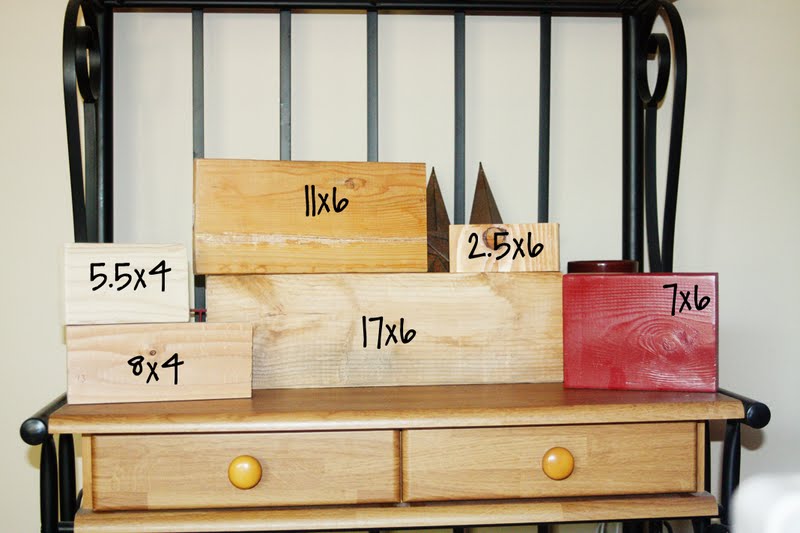
THISis my collection. It doesn't look too big, but I would say there are around 50-75 blocks of wood in there! I've come about the wood in various ways, I started out by raiding the 'scrap bins' at home depot. They usually have manageable sizes of random wood for cheap, and will cut it for really cheap, if not free. I would just have them cut me a bunch of random sizes, that way I had a bunch to choose from when I got home.
When we moved there was a pool in the backyard of our new house, the pool is now gone, but it left behind a HUGE stack of wood that the Bank had used to cover the pool.
Needless to say, between this stash and the fact that my Dear Hubby was nice enough to ask for a saw for christmas, I haven't had to go to Home depot for wood in quite awhile.
Now onto the cutting of the wood. I have a few basic sizes that I like to work with. But really you can get them cut to any size that you want
I'll give you a little run down of the sizes:
5.5x4 and 8x4 - I like to use these two sized together and stack them. Ive done Happy Valentines, Happy Halloween, basically Happy Anything. :)
11x6 - I use this size for gifts a lot, I just did a baby name on one for a friend's shower, and I use them as wedding gifts. But it's a good basic size for just about anything!
17x6 - This is a good size for a LONG name, or a quote. I cant find one of these that I have kept, so you'll just have to trust me ;)

2.5x6 - I probably have used this size the most, they are perfect to just stick on a shelf somewhere or as small gifts. I used these for neighbor gifts for Christmas and they worked great!


7x6 - This is another good size for basic decorating. You cant fit much on it, but its perfect for short words (Love, USA, Boo, etc)
Another good size to have on hand that I am out of in my box, is a square block. I use 6x6's and 8x8's mostly.
Here are a few more examples that I just dug out of my decoration boxes.
 Anyways I hope this helps you get an idea of how to start a 'wood stockpile' of your own! It's SO nice to just be able to whip up a Wedding gift, or a few holiday decorations for free!

Thursday, June 23, 2011

Perfect Potato Salad

8 Potatoes - peeled, cut into bitesized cubed, and boiled.
4 hard boiled eggs (*see footnote)
1 cup Miracle Whip, or less depending on how 'saucy' you want it
2 TBS mustard
1/2 cup chopped pickles + 2TBS pickle juice
1/2 cup sliced olives
1/4 cup chopped green onion (optional)
1/2 tsp garlic powder
1/2 tsp black pepper
1/4 tsp onion powder
1/4 tsp seasoned salt
1/4 tsp celery seed
Paprika

While potatoes and eggs are boiling, mix all of the ingredients EXCEPT for the eggs and potatoes in a bowl. When the potatoes and eggs have cooled, chop the eggs and add them to the potatoes. Add the Miracle Whip mixture to the eggs and potatoes and mix just until combined. Sprinkle paprika over top and chill until very cold.

* Want to know how to boil PERFECT eggs every time? place your eggs in the botton of a sauce pan, add enough water to cover the eggs about an inch above the tops with cold water. As soon as the water comes to a boil, cover with a lid, and turn off the heat. Allow the eggs to sit in the water for 15 minutes. If you do all this right, you'll get perfect boiled eggs!!

Wednesday, June 22, 2011

2x4 Firecracker Tutorial

I LOVE 4th of July decorations! Probably more than the average person I am sure. These were super easy and fun to make!
All you need is...
3 2x4 chunks cut at random heights ( I just plucked 3 from my big box of wood scraps)
red, white and blue paint
tape, stickers or vinyl
foam paintbrush
sander
any dark stain
hammer and a thick nail
rusty (or not rusty) wire

I started out painting all 3 blocks with an off white spray paint. I use Rustoleum 2x coverage in Heirloom White. It's my go to spray paint!
So after those all dried, I taped off stripes, and stuck some random vinyl stars on one. Then I painted over the other parts of the blocks with the red and blue paint.
When that paint was dry I removed the tape and vinyl. The lines weren't perfect, but that was fine with me because I wanted the vintage-y look. Anyways so then I sanded around the edges and rubbed some stain on them.
For the wire sparks, I took some old wire my husband had in the garage, cut it into some short peices and curled them around a pencil. Then I took a large nail and hammered 3 holes into the tops of the blocks and stuck the wire in.
that brought me to this point. They were cute, but a little too plain for my taste. SO I raided my craft room, and found some netting and metal numbers to spruce them up a bit!
I was really happy with how they turned out! And even happier that they costed me nothing!

Monday, June 20, 2011

Zucchini and Mushrooms

Our zuchini plants are starting to produce! and quickly! We LOVE any kind of squash at our house, but this is the way we usually have it.
You need...
2 small zucchini (smaller=more tender so its better to use 2 small instead of 1 big)
1/2 -1 cup of mushrooms
1 sweet banana pepper (optional.. we have a TON of these in our garden so we are putting them in EVERYTHING!)
1 TBS olive oil
1/4 tsp garlic powder
1/2 tsp lemon pepper seasoning
salt to taste
pepper to taste

In a shallow pan, heat olive oil, and the rest of the ingredients and saute on medium until zucchini and mushrooms are tender. If you are in a hurry, put a lid on the pan so they will sort of steam, and they will get soft faster.

Saturday, June 18, 2011

Harmon's Sloppy Bobs


A new take on the original Sloppy Joes.
So yummy!


Ingredience:
1 lb. lean ground beef
1 chopped onion (optional. I just did onion flakes)
1 chopped red bell pepper (optional)
1/2  6 oz. can tomato paste
1 bottle Harmon's Smokey Bacon (my favorite) or Harmon's Smoked Habanero sauce

Brown ground beef in skillet, add onions & red pepper & simmer til tender. Pour in tomato paste and Harmon's sauce then heat through.
ENJOY!

Cheesy Fried Ravioli

These were SO yummy! Not SO healthy, but ya gotta live a little sometimes, right?
You need...
appx. 8-10 cheese ravioli per person for a meal cooked according to package directions and set aside to dry.
2 eggs
1 TBS water
2 cups bread crumbs, seasoned or not
1 tsp. garlic powder plus 1/2 tsp. (separated)
1 tsp. parsley
1/2 tsp onion powder
2 TBS Parmesan cheese
oil for frying

In a  shallow bowl, combine eggs, water and 1/2 tsp garlic powder and set aside. In a separate bowl, combine bread crumbs, the remaining garlic powder, parsley, onion powder and parmesan cheese.
In a large frying pan, heat enough oil to come up the pan about a 1/2 inch. To test if the oil is hot enough, stick a wooden spoon into the oil, if bubbles form, its ready. one at a time, dip the ravioli into the egg mixture and then into the breadcrumb mixture. Place CAREFULLY into the oil and allow to fry until golden brown before turning over. Allow to drain and cool a bit on paper towels.
Dip in warmed marinara sauce.

We had these plain for dinner, but I think they would be REALLY good in a salad, or as an appetizer!

Use the code STMMMS84668 to get $10 off instantly!
Related Posts Plugin for WordPress, Blogger...